Learning Autonomy
 Underwater Autonomous RobotThis picture was a week before the competition. There were a few changes after this, but this is the nicest picture we have of the robot. Well, the second best picture (see next photo). |  A strong teamThis is my team. From the left: myself (software lead), Ryan Smith (mechanical lead), Nick Bedi (project manager), Banky Adebajo (electrical lead). Together we designed, struggled, optimized, and endeavoured to make an underwater autonomous robot. |  Starting from scratchThis was drawn by our mechanical lead (Ryan Smith). I included this picture because I wanted to show what we started with... a drawing. |
|---|---|---|
 Mechanical phaseThe initial phase of the design was dominated by mechanical work. At the time we were taking a class on Fluids and learned about how ducts can be used to increase thrust. |  Wiring phaseThe second major phase was getting the motors functional and writing fault tolerant software could efficiently control the motors. The electrical lead and myself worked on this. I decided to use Raspberry Pi instead of Arduino because: it has a faster processor, multiple cores, and because it can use Python which helps for image processing. |  Working togetherEarly on in the project, I jumped in with the mechanical lead to help with tasks on the critical path. I lathed some couplers for the motors, epoxied a lot of things and did some soldering. I can tell I did a good job because I'm still friends with the mechanical guy :). |
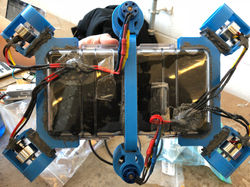 SymmetryWe made an effort to balance the design as much as possible so the vehicle would have a natural orientation in the water which was conducive to maintaining control of the robot. |  Putting it all togetherThe most overlooked challenge that we faced was fitting everything inside the body. If we didn't pack it perfectly, then we would put pressure on the case and affect the water proofness. That caused us a lot of grief. |  The biggest setbacksWe did a lot of water proofing tests. We were constantly fighting with water proofing issues. This caused us a lot of setbacks including having to replace the camera, and pressure sensor. |
 Final designIn the end we got things working and we were ready for demo day. |  DemoOur robot successfully navigated through 3 of the 5 obstacles autonomously. We didn't account for the large drafts in the swimming pool and our vehicle wasn't able to get back on course autonomously so we switched to tether mode and finished. It was a great learning experience. |
Underwater Autonomous Robot
2018
Three teammates and myself embarked on a project that really tested our limits. I took the role of software lead and decided on things like:
-
What platform/language will we use?
-
How do we schedule the tasks appropriately? Do we use multiprocessing?
-
How will we sense the world?
-
How will we localize?
1. For the platform, I knew we needed something that could at least handle image processing (since we wanted to do image analysis to localize our robot). So Arduino is out of the question. We could have used an old Android phone, but then it would require additional parts to establish GPIOs so I decided on the Pi. It had a reasonable amount of processing power and multiple cores (which is nice for multiple processes in robotics).
2. Multiprocessing was an important feature because we want to have multiple systems running in parallel. For example, we have a control loop on the pressure sensor to maintain the depth of the robot. I wanted to ensure that the control loop had its own process so there wouldn't be any unexpected delays caused by heavier tasks like image processing. Another reason that I wanted multiple processes is because I wanted to have a watchdog process that could act if something went wrong. In the watchdog process, if I saw that the motor controller process has died, I would write to the motors and tell them to stop moving--incase the motor controller process didn't get a chance to.
3. Sensing the world was a big question. Light sensors don't work well underwater and color will shift as an observer gets farther from an object. The pressure sensor was a key asset since it was so accurate (it just needed to be calibrated at startup). Acoustics would produce a lot of reflections in the water and we didn't want to spend all our time doing signal processing. We tried an 9 DOF IMU that gave good results for orientation so we used that for our control loop to ensure we were moving straight. Lastly, I decided to use a camera. I realized this would be a big endeavour since there were many unknowns, but I knew that we should try it because it would be vital to localization.
4. Localization hinged on the camera. Unfortunately, we got water damage on the camera and many of the pictures it took were blurry. Our algorithms could not find the features we were looking for in the blurry images. We had to give up on localization and change strategies due to the setbacks we experienced and the looming deadline of demo day. Instead I opted to hard-code the movements of the robot. I created an application to record inputs from a game pad controller and I steered through the course. The application recorded inputs, duration. Then I made an application to playback those commands. The commands were sent as goals to the control loop processes. It worked amazingly well (in a controlled environment).
All in all, I think we did pretty well. I enjoyed the responsibility and I realized that I really enjoyed having a role where I could make key decisions to the final product.