Multi-Disciplinary
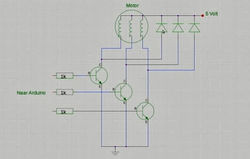 A Brushless Motor CircuitEvery project starts somewhere. I started with finding a good motor that could have high rpm and low wear, like a brushless motor. |  Developing a Motor ControllerAfter salvaging a BLDC from an old hard drive, I worked on developing a motor controller circuit using an Arduino, some transistors, and AccelStepper library. |  EfficiencyI tried increasing the efficiency by using a bipolar circuit, compared to the unipolar one before. |
|---|---|---|
 Transistor HeatThe transistors heated up a lot because the Arduino wasn't able to fully open them. I used a fan to cool them down, but it didn't work well enough. |  A Power SupplyInstead of building my own power supply, I re-purposed an old PC power supply. With a little tweaking, it worked great! |  Unwanted WiresTo tidy the wires, I isolated each wire with heat shrink and taped all of the wires with the same potential together. |
 Arduino CaseUsing a set of calipers, too much time on my hands, and a laser printer, I made a nice case for the Arduino. |  Clever DesignKnowing that I was still going to communicate with the Arduino, I made a hole for the USB cable. This type of hinge is called a "living hinge" and is very useful for making hinges by laser cutting. |  Wire MessHave to keep the wires tidy. There were a lot of them. |
 Wire CaseThe wire case I made did a pretty good job of keeping things neat. |  Project BoardThe build begins to take shape. |  Metal Lathe WorkGuides needed to be created to guide the wire. |
 Cooling FanA cooling fan was added for safety. |  First Test RunThe first time the device was tested was a week before my job finished. |  Thin WireThe wire being used is 44 gauge. That's smaller than a human hair! |
 Nerve WreckingThe first test run was an extremely nervous experience. A week before my job ended and this HAD to work. |  Quality WindingsIt worked! Look at those windings |  Finished ProductThe guitar pickup here has about 9000 windings on it and it took me about 10 minutes to wind. |
Guitar Pickup Winder
2015
A guitar pickup has 6 magnetized cylinders wrapped with about 9000 windings of copper wire and is to transduce an audio signal in an electric gutiar from the string vibration.
While I was working for the Engineering Ideas Clinic I was approached by a professor at the University of Waterloo who requested a device to wind guitar pickups for his students to learn about magnetism by making and modelling a guitar pickup. An intern had already constructed one for him preivously but it took 6 hours to make 6000 windings, making it impossible for an entire class to do this.
In this situation I did not have a large budget and so I had to be resourceful.
The challenge was to make something, efficient, and reliable so a class of 60 students could make a guitar pickup in a reasonable amount of time. This was particularly challenging since guitar pickups use 44 gauge wire--that's thinner than a human hair.
Into the e-waste bin I dove. There I found an old PC power supply, an old hard drive, a PC fan, and wiring. To get the desired rpm of the brushless hard drive motor, I used timer interrupts on an Arduino Uno and a custom unipolar circuit. The result was a device which could wind 9000 wraps onto a guitar pickup in 10 minutes.
An affordable solution. An improvement by 54x. An environmentally friend approach.